Choose a Store
- Shop All
- Replacement Parts
- Performance Parts
- Accessories
- Oil & Fluids
- Special Offers
- Advance Rewards
- Advice & How-Tos
- Project Guides
Share


How Would You Like To Get This Item?
Store Pickup
Same Day Home Delivery
Home Delivery
Product Information
Product Details
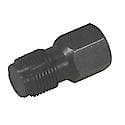
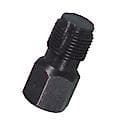
Part No. 12230
Warranty Details (30 Day Warranty)
Lisle 12230 Oxygen Sensor Thread Chaser, Cleans Threads in Oxygen Sensor Hole
Product Features:
Product Features:
- Use with 3/4" hex socket or 3/8" square drive
- Works on M18 X 1.5 spark plug thread
4.74 out of 5
31 Customer Reviews
93% of respondents would recommend this to a friend
Ratings Distribution
5 Stars
26
4 Stars
4
3 Stars
0
2 Stars
0
1 Star
1

Pros
No Pros
Cons
No Cons
Most Liked Positive Review
Heat bung with torch and use lots of anti-seize
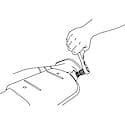
Worked great for my purpose. I have a 2007 f150 with a 5.4L 3 valve. The passenger side downstream sensor came out with no threads on it. I got this from my local advanced auto parts and was able to rethread the hole and get the new sensor installed. Heat up the bung with torch, coat tool with anti-seize, and take your time. Work it back and forth, tighten it in a little further each time. Remove it from the hole, clean off all the shavings, and attempt to screw it in by hand. If you cant get it in by hand, screw it all the way down, remove and clean again. Rinse and repeat until you can screw tool in by hand. Be careful when tightening the new O2 sensor, the threads will likely not be as strong as they once were. Don't over tighten.
Most Liked Negative Review
Waste of money
Unless you just want to clean dirt out of the threads it is useless. If your threads are damaged at all get a real tap.
Even attempted to grind down the first thread to help it bite and nothing.
Its just a bolt with flutes in it.
Reviewed by 31 Customers
SAVED ME A LOT OF TIME AND MONEY!
My O2 sensor threads were partially galled and the new sensor wouldn't thread in. I really didn't think this $7 tool would work, but the option was to cut out the exhaust pipe and splice in a new section, so I figured I didn't have much to loose. This tool worked great! In about 10 minutes I had clean threads again, and the new sensor screwed in tight. Take your time and use lots of lubricant.
Bottom Line Yes, I would recommend to a friend
Must have tool if you've got a stripped o2 sensor port
I thought I was in for a whole world of hate when I removed my stripped o2 sensor. Not sure if the part was stripped before or after removal, but it was a sure thing that the replacement was not going in. With the help of this tool and plenty of anti-sieze as lubricant, I was able to create the threads needed to pop the replacement o2 sensor back in. Saved me a lot of grief and the car is running great now!
Bottom Line Yes, I would recommend to a friend
Yes I would this item
It works just heat the bung 5 to 6 six time with torch and use lots of anti-seize just like the previous user.
The right tool for the Job!
Heat and Lots of anti- sieze. Just like the previous comments, My 1992 F150 with 148K had the original O2 sensor. I had to torch it several times finally cut it in half then use an air gun. Totally stripped. The truck sat for many years, Be patient work it a little at a time heat and reheat until you can srew the tool in by hand.
Bottom Line Yes, I would recommend to a friend
Heat bung with torch and use lots of anti-seize
Worked great for my purpose. I have a 2007 f150 with a 5.4L 3 valve. The passenger side downstream sensor came out with no threads on it. I got this from my local advanced auto parts and was able to rethread the hole and get the new sensor installed. Heat up the bung with torch, coat tool with anti-seize, and take your time. Work it back and forth, tighten it in a little further each time. Remove it from the hole, clean off all the shavings, and attempt to screw it in by hand. If you cant get it in by hand, screw it all the way down, remove and clean again. Rinse and repeat until you can screw tool in by hand. Be careful when tightening the new O2 sensor, the threads will likely not be as strong as they once were. Don't over tighten.
Bottom Line Yes, I would recommend to a friend
Displaying Reviews 1 - 5Back to Top
No results
Feedback
Be The First To Know About Deals And Promotions.
Plus, create an account to receive $5 off of $20 or more.
TOP REPLACEMENT PARTS
ROUTINE MAINTENANCE PARTS
CUSTOMER SUPPORT
ABOUT US
PROFESSIONAL SHOPS