- Shop All
- Replacement Parts
- Performance Parts
- Accessories
- Oil & Fluids
- Special Offers
- Advance Rewards
- Advice & How-Tos
- Project Guides
Air Conditioning Recharge
How To Repair Your A/C
How To Recharge Your A/C
How To Recharge Your A/C
Diagnosis and repair.
One of the most common causes of the A/C system not performing properly is a low refrigerant level. This occurs most often when the A/C compressor is not engaging. If the A/C compressor isn't engaging, we have what you need to add refrigerant to your car's system and get it working again.
Let's go through the three easy steps to recharging your A/C.
Pro Tip
It is very important to use the correct type and exact amount of refrigerant and system lubricant in all A/C systems. Most vehicles on the road today use R134a refrigerant. Check your vehicle owner's manual for A/C specifications.
Difficulty Rating
Good for beginners – A new DIYer will be able to complete the project
Estimated Time
15 - 30 minutes
Recharge your A/C in 3 easy steps!

1. Locate the refrigerant fill port:
This is the low pressure side of the system and will have a small plastic lid with an "L" printed on the top. Unscrew this cap to reveal the port.
If you find the "H" (high) side port, do not try to recharge through this port. It is incorrect.
On most A/C recharge kits, the fill hose will only fit onto the low side port.

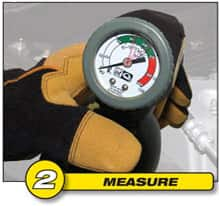
2. Determine the correct pressure to fill:
Consult the gauge provided with your dispenser to determine the minimum and maximum acceptable pressure readings for the current outside air temperature. Be sure to have the A/C system set to "Max A/C" in the car.
You will want to make sure the A/C compressor is engaged and wait about 30 seconds to get an accurate reading. If the compressor is not engaged, contact an authorized repair facility for further assistance.

3. Begin charging the system:
If it is determined that the system requires refrigerant, you can begin to depress the trigger and shake the can while doing so.
Pause periodically to make sure you do not overfill the system. Continue charging the system until the pressure gauge indicates the system is refilled to the proper level.
Take charge of your A/C!
- Go from hot and sweaty to comfortably cool in 10 minutes or less with A/C Pro.
- A/C Pro comes with everything you need, plus easy-to-follow instructions.
- If you can fill your tires, you can use A/C Pro. Potentially save hundreds of dollars on A/C maintenance.
